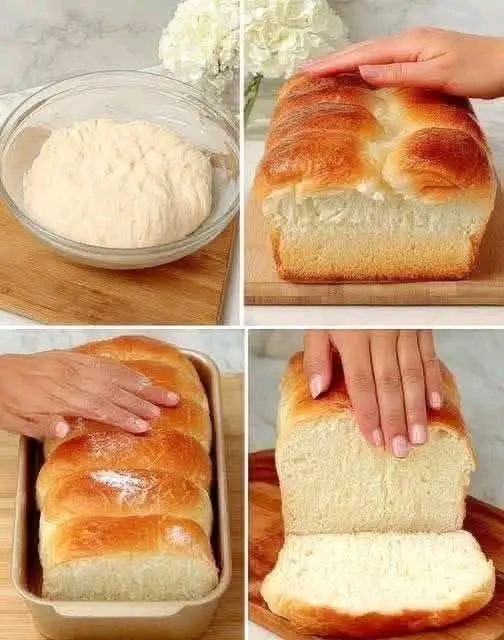
There’s a reason this soft milk bread loaf shows up again and again in home bakers’ feeds — that impossibly soft, pillowy crumb paired with a deep golden, slightly glossy crust is the kind of thing that makes people stop scrolling. It looks like something from a professional bakery, but it comes together with a straightforward dough, a little patience for rising, and an oven.
This style of bread, often called milk bread or Japanese-style shokupan, gets its signature softness from a simple technique: a portion of the flour and liquid is cooked into a thick paste before being mixed into the rest of the dough. That paste locks in extra moisture, which is exactly why this bread stays soft and tender for days instead of turning stale and dry the way a lot of homemade bread does.
Once baked, the loaf slices beautifully into soft, even pieces perfect for sandwiches, toast, or just tearing into warm with a pat of butter while it’s still cooling on the counter. It’s a bread that rewards a little bit of hands-on time with a result that genuinely rivals what you’d pay a premium for at a specialty bakery — and there’s something deeply satisfying about pulling a loaf like this out of your own oven.
Why You’ll Love This Recipe
- Incredibly soft texture — a special technique keeps this bread tender and pillowy for days.
- Beautiful golden crust — an egg wash gives it that glossy, bakery-style finish.
- Great for sandwiches and toast — it slices cleanly and holds up well to fillings without falling apart.
- Makes your kitchen smell amazing — few things beat the smell of fresh bread baking.
- Freezer-friendly — bake a loaf now and enjoy slices whenever you want, straight from the freezer.
Ingredient Notes
The secret to this bread’s signature softness is the tangzhong, a cooked flour-and-liquid paste made by whisking flour into milk or water and heating it gently until it thickens into a thick paste. This step might feel like an extra hassle, but it’s what gives milk bread its long-lasting tenderness, and skipping it will result in a noticeably denser, drier loaf.
For the dough itself, bread flour is preferred over all-purpose flour because its higher protein content gives the dough more structure, helping it rise tall and hold its shape while still staying soft inside. All-purpose flour can work in a pinch, but the loaf will be slightly less structured and a touch denser as a result.
Whole milk, an egg, and softened butter round out the enriched dough, giving it richness and that classic golden color once baked. Active dry yeast or instant yeast both work well here — just make sure your yeast is fresh, since old or expired yeast is one of the most common reasons homemade bread fails to rise properly.
[Recipe card goes here — Jump to Recipe]
Step-by-Step Instructions
- Make the tangzhong: In a small saucepan, whisk together 3 tablespoons bread flour and ½ cup whole milk until smooth. Cook over medium-low heat, whisking constantly, until it thickens into a thick paste, about 2–3 minutes. Remove from heat and let cool to room temperature. Tip: this mixture should be thick enough to hold a trail when you drag a whisk through it — if it’s too thin, it hasn’t cooked long enough.
- In a large mixing bowl or stand mixer, combine 3 cups bread flour, ¼ cup sugar, 1½ teaspoons salt, and 2¼ teaspoons active dry yeast. Add the cooled tangzhong, ½ cup warm milk, and 1 large egg.
- Mix and knead the dough for about 5 minutes until it starts to come together, then add 3 tablespoons softened butter, a bit at a time, kneading until fully incorporated. Continue kneading for another 8–10 minutes until the dough is smooth, soft, and elastic. Tip: the dough should be slightly tacky but not sticky — add a small amount of extra flour only if it’s sticking heavily to your hands or the bowl.
- Shape the dough into a ball and place it in a lightly greased bowl. Cover with plastic wrap or a damp towel and let it rise in a warm spot for about 1 hour, or until doubled in size.
- Punch down the risen dough and divide it into 3 equal pieces. Shape each piece into a smooth ball, then roll each ball out into an oval and fold it into a log shape. Tip: rolling and folding each piece the same way helps create those distinct rounded humps on top of the finished loaf.
- Place the 3 shaped logs side by side into a greased 9×5-inch loaf pan. Cover loosely and let rise again for 45–60 minutes, until the dough rises about an inch above the edge of the pan.
- Preheat your oven to 350°F (175°C). Brush the top of the risen loaf gently with an egg wash (1 egg beaten with a tablespoon of milk). Tip: brush gently so you don’t deflate the risen dough underneath.
- Bake for 30–35 minutes, until the top is deep golden brown and the loaf sounds hollow when tapped on the bottom. If the top browns too quickly, tent it loosely with foil for the last 10 minutes. Tip: use an instant-read thermometer if you have one — the internal temperature should read about 190°F when fully baked.
- Remove the bread from the pan immediately and let it cool on a wire rack for at least 30 minutes before slicing, so the crumb has time to set properly.
Nutrition Snapshot (Per Serving, Estimated)
Based on 12 slices per loaf:
- Calories: ~160
- Protein: ~5g
- Carbohydrates: ~27g
- Fat: ~4g
These figures are approximate estimates. This is a traditional wheat-flour bread and is not low-carb or carb-free — the carbohydrate content shown reflects that.
Storage & Reheating
This bread stays soft at room temperature, stored in an airtight bag or container, for up to 3–4 days. To keep it fresh even longer, slice the loaf and freeze individual slices in a freezer bag for up to 3 months, toasting them straight from frozen whenever you want a slice. Avoid refrigerating this bread, as the cold tends to dry it out and speed up staling compared to room temperature or freezer storage.
Budget Note
This recipe costs roughly $0.30–$0.40 per slice, making it significantly cheaper than a comparable loaf of specialty bakery bread. To save even more, buy bread flour and yeast in bulk if you bake often, since the cost per loaf drops considerably compared to buying small packages each time.
Variations to Try
Meal-Prep Friendly: This bread freezes exceptionally well once sliced, making it easy to portion out a loaf and pull individual pieces as needed throughout the week. Toasting frozen slices directly in the toaster works great and saves you from needing to thaw ahead of time.
Enriched Sweet Version: Add an extra tablespoon of sugar to the dough along with a teaspoon of vanilla extract for a slightly sweeter loaf that works beautifully for French toast or as a base for bread pudding. A light dusting of cinnamon sugar on top before baking is a nice touch for this variation.
Whole Wheat Swap: Replace up to half the bread flour with whole wheat flour for a heartier, slightly nuttier loaf with more fiber. Keep in mind the texture will be a bit denser than the classic all-white-flour version, so consider adding an extra tablespoon of milk to keep the dough from getting too stiff.
Dinner Roll Version: Use the same dough to shape individual dinner rolls instead of a loaf, baking them in a greased pan at 350°F for about 18–20 minutes. This is a great option if you want individually portioned bread for a holiday table instead of a full loaf.
Frequently Asked Questions
Is this bread actually low-carb or carb-free? No — this is a traditional wheat flour bread, and like any bread made with flour, it contains a meaningful amount of carbohydrates per slice. If you’re looking for a genuinely low-carb bread option, you’d need a recipe built around almond flour, coconut flour, or another low-carb flour alternative instead.
Can I make this ahead of time? Yes, this bread freezes beautifully once fully baked and cooled, making it a great make-ahead option. Slice it before freezing so you can pull out just what you need without thawing the whole loaf.
Why didn’t my dough rise properly? This is almost always due to expired or inactive yeast, or a rising environment that’s too cold. Test your yeast beforehand by dissolving it in warm water with a pinch of sugar — it should foam within about 10 minutes if it’s still active.
Can I make this without a stand mixer? Absolutely — this dough can be kneaded by hand, though it will take a bit longer, around 12–15 minutes, to reach that smooth, elastic texture. It’s a great arm workout, and the results are just as good as using a mixer.
What can I use this bread for? It’s fantastic for sandwiches, toast, French toast, or simply eaten warm with butter. Its soft texture also makes it a wonderful base for bread pudding or homemade croutons if it starts to go a little stale.
Related Recipes You’ll Love
- Classic Homemade Dinner Rolls — using a similar enriched dough technique in individual roll form.
- Cinnamon Swirl Bread — a sweeter twist using the same soft, tender loaf base.
- Fluffy Brioche French Toast — a great way to use up slightly stale slices of this same style of bread.