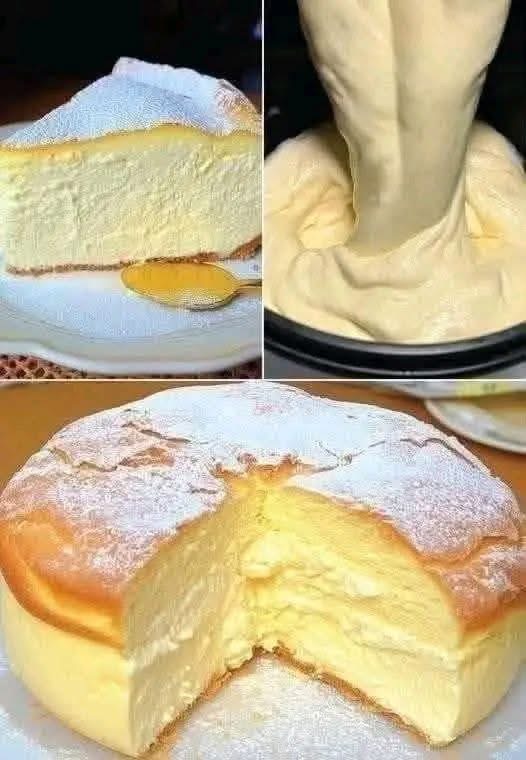
When it comes to delicate, melt-in-your-mouth artisan desserts that bring an authentic French-Japanese bistro experience straight to your kitchen table, nothing rivals a towering Japanese Soufflé Cheesecake. Featuring a cloud-like, jiggly structure, a golden dusted top, and a rich, velvety cream cheese crumb, this soufflé cake strikes the ultimate balance between a delicate sponge cake and a rich baked cheesecake.
By folding stiff-peaked egg whites into a velvety cream cheese batter and baking slow in a gentle hot-water bath (bain-marie), you achieve a cake that rises beautifully with a airy, melt-in-your-mouth consistency. Finished with a delicate dusting of powdered sugar, this showstopping dessert delivers artisanal elegance for special celebrations, high-tea gatherings, or weekend baking projects. Let’s walk through the full ultimate 13-section guide to mastering this recipe!
1. Why You’ll Love This Recipe
- Melt-in-Your-Mouth Cloud Texture: The combination of whipped meringue and warm water-bath baking produces a signature jiggly, feather-light bite.
- Balanced Creamy Flavor: Offers the savory richness of classic cream cheese without feeling heavy or overly sweet.
- Signature Golden Bakery Top: Baked to a soft golden brown and dusted lightly with powdered sugar for a cafe-worthy presentation.
- Pure Baking Luxury: Master professional pastry techniques like folding meringue and water-bath roasting right in your home oven.
2. Ingredients Overview & Notes
Selecting quality dairy staples and ensuring exact room-temperature measurements guarantees a smooth batter that folds seamlessly:
Batter Base & Creamy Emulsion:
- Cream Cheese (250g / 8.8 oz, softened to room temperature): Standard full-fat brick cream cheese provides the necessary structure and creamy flavor.
- Unsalted Butter (50g / 3.5 tablespoons): Melted into the warm dairy base to add a silky, rich mouthfeel.
- Whole Milk (100ml / ~7 tablespoons): Hydrates the batter to ensure the crumb remains moist and fluffy.
- Egg Yolks (6 large, room temperature): Adds rich golden color, structure, and emulsification to the batter base.
- Cake Flour or Low-Protein Flour (60g / ~1/2 cup): Low protein content prevents gluten development, ensuring the cake remains cloud-soft.
- Cornstarch (20g / ~2 tablespoons): Stabilizes the crumb structure and helps hold the cake’s height after cooling.
- Fresh Lemon Juice (1 tablespoon) & Vanilla Extract (1 teaspoon): Adds a bright citrus tang and warm aromatic fragrance.
Whipped Meringue Structure:
- Egg Whites (6 large, chilled): Cold egg whites whip into a stable meringue with fine, tight air bubbles.
- Granulated Sugar (140g / ~11 tablespoons): Added gradually to the egg whites to build a glossy, velvety meringue peak.
- Cream of Tartar (1/4 teaspoon) or Lemon Juice (1/2 teaspoon): The acid stabilizes the egg white proteins so they don’t collapse during folding.
- Powdered Sugar: For dusting over top of the cooled cake before serving.
3. Essential Kitchen Equipment
- 8-inch Deep Round Springform Pan or Cake Pan (with removable bottom or high walls): Needs at least 3-inch walls to accommodate the tall rise.
- Parchment Paper: Crucial for lining the bottom and sides to ensure effortless release without tearing.
- Large Roasting Pan: Serves as the outer water bath (bain-marie) to hold hot water during baking.
- Electric Hand Mixer or Stand Mixer & Silicon Spatula: For whipping the egg whites into stable meringue and gently folding.
4. Step-by-Step Cooking Guide
Step 1: Prep the Oven and Springform Pan
Preheat your oven to 320°F (160°C). Grease an 8-inch round deep cake pan and line the bottom and inner sides with parchment paper, extending the side lining 2 inches above the rim. If using a springform pan, wrap the outside bottom securely with 3 layers of heavy-duty aluminum foil to prevent water from seeping into the cake.
Step 2: Melt Dairy and Emulsify
Place the 250g cream cheese, 50g unsalted butter, and 100ml whole milk in a heatproof bowl set over a pot of gently simmering water (double boiler). Whisk continuously until the cream cheese and butter are completely melted, smooth, and lump-free. Remove from heat and let cool until lukewarm.
Step 3: Whisk Yolks and Sift Flours
Whisk the 6 egg yolks into the warm cream cheese mixture one at a time until incorporated. Stir in 1 tablespoon of fresh lemon juice and 1 teaspoon of vanilla extract. Sift the 60g cake flour and 20g cornstarch directly into the bowl and whisk gently until a smooth, silky batter forms. Pass the batter through a fine-mesh sieve into a clean bowl for ultimate smoothness.
Step 4: Whip the Meringue to Soft-Medium Peaks
In a clean, grease-free glass bowl, beat the 6 chilled egg whites with 1/4 teaspoon cream of tartar using an electric mixer on medium speed until frothy. Gradually add the 140g granulated sugar in three equal additions while continuing to beat. Beat until the meringue reaches soft-to-medium peaks (the meringue should form a gentle, curved beak when the beaters are lifted). (Note: Do not over-whip to stiff peaks, or the cake will crack during baking!)
Step 5: Fold Meringue into Batter
Scoop 1/3 of the whipped meringue into the cream cheese batter bowl. Use a balloon whisk to gently mix until combined. Pour this lightened mixture back into the remaining meringue. Using a silicone spatula, gently fold the batter using a sweep-and-cut motion until uniform, glossy, and airy (as shown in the batter pouring photo).
Step 6: Bake in Hot Water Bath
Pour the velvety batter into your lined cake pan. Tap the pan gently on the counter twice to release large air bubbles. Place the cake pan inside a larger deep roasting pan. Pour hot water (approx. 140°F / 60°C) into the outer roasting pan until it reaches halfway up the side of the cake pan.
Bake at 320°F (160°C) for 20 minutes, then lower the oven temperature to 230°F (110°C) and bake for an additional 60 minutes until the cake is risen, pale golden-brown on top, and slightly set. Turn off the oven and leave the door propped open slightly with a wooden spoon for 15 minutes to let the cake cool gradually without collapsing.
Step 7: Dust and Serve
Carefully lift the cake out of the water bath and peel away the parchment lining. Transfer to a serving platter, dust generously with powdered sugar using a fine sifter, slice with a warm knife, and serve warm or chilled!
5. Pro Chef Tips for Success
- Do Not Over-Whip the Meringue: Stop beating when soft-medium peaks form. Over-whipped stiff meringue traps too much air, which causes the cake to expand rapidly and crack in the oven before deflating.
- Cool Slowly in the Oven: Sudden temperature shifts cause delicate soufflé cakes to sink. Leaving the cake in the turned-off oven with the door ajar allows it to set gently.
- Pass Batter Through a Sieve: Straining the cream cheese and yolk batter before folding in meringue guarantees a velvety, melt-in-your-mouth crumb without lumps.
6. Delicious Flavor Variations
- Japanese Matcha Soufflé Cheesecake: Sift 1.5 tablespoons of ceremonial-grade matcha powder in with the cake flour for a vibrant green tea flavor.
- Lemon Zest Infusion: Add the finely grated zest of 1 fresh lemon to the cream cheese batter for an extra bright citrus aroma.
- Dark Chocolate Marble Soufflé: Fold 2 tablespoons of melted dark chocolate into a small portion of batter and swirl over top before baking.
7. What to Serve with Soufflé Cheesecake
- Fresh Mixed Berries: Serve alongside fresh raspberries, strawberries, or blueberries to provide a tangy contrast to rich cream cheese.
- Warm Raspberry or Passionfruit Coulis: Drizzle a bright fruit puree over sliced cake rounds for a bistro-style presentation.
- Japanese Green Tea or Espresso: Pair warm slices with a cup of hot sencha green tea or dark roast coffee.
8. Nutritional Highlights (Estimated per Serving / Yields 8 Slices)
- Calories: ~260 kcal
- Protein: 7g
- Carbohydrates: 22g
- Fat: 16g
- Sodium: 190mg
9. Meal Prep, Storage & Reheating Instructions
- Refrigeration: Store leftover cheesecake wrapped loosely or in a cake dome in the refrigerator for up to 3 to 4 days. The flavor deepens and the texture becomes wonderfully fudgy when chilled!
- Freezing: Freezing is not recommended as it damages the delicate meringue cell structure, causing the cake to lose its fluffy height upon thawing.
- Serving Temperature: Enjoy cold straight from the fridge for a dense, creamy bite, or let sit at room temperature for 20 minutes to restore its soft, jiggly texture.
10. Budget & Cost Breakdown
- Cream Cheese (250g): ~$2.50
- Eggs (6 count): ~$1.80
- Milk, Butter & Sugar: ~$1.20
- Flour, Cornstarch & Lemon: ~$0.80
- Total Cost: Under $6.30 total for an entire 8-inch artisanal cake (approx. $0.78 per luxurious slice!)
11. Frequently Asked Questions (FAQ)
Why did my soufflé cheesecake crack on top? Cracks happen if the oven temperature is too high or if the egg white meringue was whipped to stiff peaks. Bake in a low water bath and whip meringue to soft-medium peaks only!
Why did my cake shrink significantly after baking? All soufflé cakes shrink slightly as they cool, but drastic collapsing occurs if the cake was removed from the oven too quickly without a slow cooling phase.
12. Conclusion & Social Media Sharing
This Japanese Soufflé Cheesecake brings cloud-like luxury, melt-in-your-mouth texture, and high-end bakery elegance straight to your home kitchen. Soft, golden, and dusted with sweet powdered sugar, every slice is completely unforgettable!
If you bake this jiggly cake, snap a video of the soft slice pull and share your dessert spread!
13. Social Media Caption Template
Feather-light, cloud-like Japanese Soufflé Cheesecake baked to golden perfection and dusted with powdered sugar! 🍰☁️✨ Melt-in-your-mouth perfection in every single bite!
#JapaneseCheesecake #SouffleCheesecake #BakingAtHome #DessertRecipes #Cheesecake #CakeGram #FluffyCake #SweetTreats #FoodieGrams
Are you enjoying this jiggly Japanese soufflé cheesecake served warm right out of the oven or chilled from the fridge alongside fresh berries tonight?