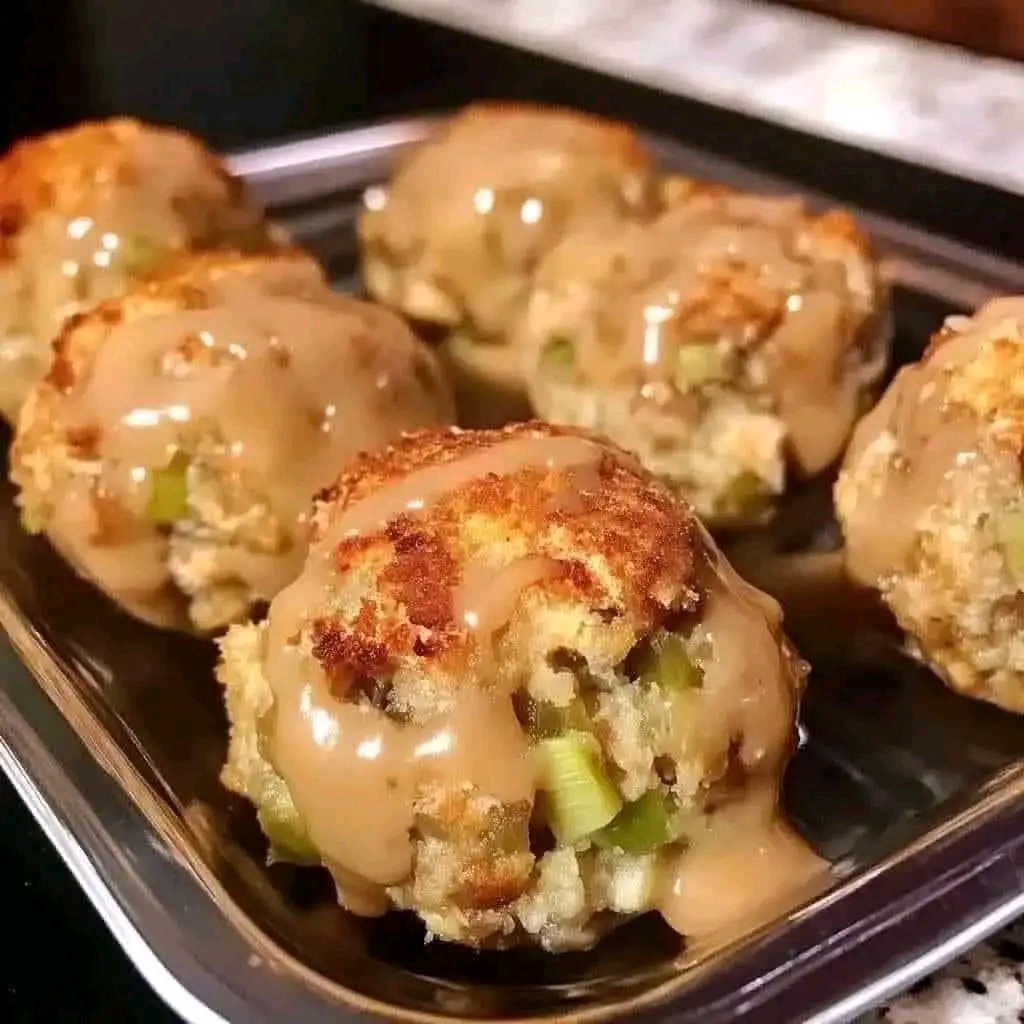
Some recipes stick around for decades because they’re genuinely special, and stuffing balls with gravy are exactly that kind of dish. Golden, savory bites of seasoned bread stuffing, studded with celery and onion, baked until crisp on the outside and tender within, then smothered in a rich, glossy gravy that pools into every crevice.
This is the kind of recipe that tends to live in family recipe boxes rather than cookbooks — handed down, tweaked slightly by whoever’s making it that year, but always instantly recognizable. What makes stuffing balls so appealing compared to a traditional stuffing casserole is the format itself: individually portioned, with more crisp, golden surface area per bite, and an easier way to serve a crowd without needing to carve out neat squares from a casserole dish.
They work beautifully as a holiday side dish, but they’re hearty enough to serve as a simple, comforting dinner on their own with a vegetable on the side. Once you’ve made a batch, it’s easy to understand why this is the kind of recipe that gets requested for forty years running.
Why You’ll Love This Recipe
- It’s deeply nostalgic and comforting — the kind of dish that feels like a family tradition from the first bite.
- The format is practical — individually portioned stuffing balls are easier to serve than a full casserole.
- The gravy ties it all together, adding richness and moisture to every bite.
- It’s a great make-ahead dish, since both the stuffing balls and gravy hold up well when prepared in advance.
- It’s endlessly adaptable, working as a holiday side or a simple weeknight main.
Ingredient Notes
The base of good stuffing balls starts with the bread. Day-old bread cubes (or a bagged stuffing mix, if you want a shortcut) work best, since slightly stale bread absorbs the broth and butter without turning to mush the way fresh bread can. If your bread is fresh, toasting the cubes lightly in the oven first helps dry them out enough to hold together properly.
Finely diced celery and onion, sautéed in butter until softened, form the aromatic backbone of the stuffing, and fresh sage or poultry seasoning gives it that classic, unmistakable holiday flavor. A beaten egg helps bind everything together so the balls hold their shape while baking, rather than crumbling apart.
For the gravy, a simple roux-based gravy made from pan drippings (or chicken broth if you don’t have drippings on hand) thickened with flour and finished with a splash of cream gives that classic glossy, rich finish. If you want a deeper flavor, browning the butter slightly before adding the flour adds a subtle nutty note to the finished gravy.
[Recipe card goes here — ingredients, step-by-step instructions, and a “Jump to Recipe” button render in this spot.]
Step-by-Step Instructions
- Sauté the aromatics. Melt butter in a skillet over medium heat and cook the diced onion and celery until softened, about 5–6 minutes. Tip: don’t rush this step — fully softened vegetables blend much better into the stuffing mixture than crunchy ones.
- Combine the stuffing mixture. In a large bowl, combine the bread cubes, sautéed onion and celery, sage or poultry seasoning, salt, and pepper. Pour in warm chicken broth gradually, tossing gently, until the bread is moistened but not soggy.
- Bind with egg. Stir in the beaten egg, mixing until everything holds together when pressed. Tip: the mixture should hold its shape when squeezed in your hand — if it feels too dry, add a splash more broth; if too wet, add a few more bread cubes.
- Shape into balls. Using your hands or a large scoop, form the mixture into tightly packed balls, about the size of a large golf ball, and place them on a greased baking sheet or dish.
- Bake until golden. Bake at 375°F for 25–30 minutes, until the outsides are golden brown and slightly crisp. Tip: rotating the pan halfway through baking helps them brown evenly, especially if your oven has hot spots.
- Make the gravy. While the stuffing balls bake, melt butter in a saucepan, whisk in flour to form a roux, and cook for a minute until lightly golden. Slowly whisk in chicken broth (or pan drippings, if available), stirring until smooth. Simmer until thickened, then stir in a splash of cream. Tip: add the liquid gradually while whisking constantly — dumping it in all at once is the most common cause of lumpy gravy.
- Season the gravy. Taste and adjust with salt and pepper, and add a pinch more sage if you want to echo the flavor of the stuffing balls themselves.
- Plate and serve. Arrange the baked stuffing balls on a serving dish and spoon the warm gravy generously over the top just before serving.
Nutrition Snapshot (Per Serving, Estimated)
- Calories: approximately 260–300
- Protein: approximately 8–10g
- Carbs: approximately 28–32g
- Fat: approximately 12–14g
These are estimates based on standard ingredient measurements and will vary depending on exact brands and portion sizes used.
Storage & Reheating
Leftovers keep well in an airtight container in the fridge for up to 4 days, with the gravy stored separately if possible to keep the stuffing balls from turning soggy. Reheat in a 350°F oven for about 15 minutes, then warm the gravy separately on the stovetop and spoon it over just before serving.
Both the baked stuffing balls and the gravy freeze well for up to 2 months when stored separately. Thaw overnight in the fridge, then reheat the stuffing balls in the oven and the gravy on the stovetop, adding a splash of broth if the gravy has thickened too much after freezing.
Budget Note
This recipe runs roughly $1.50–2 per serving, making it an affordable, filling dish built mostly from pantry staples. To stretch it further, use a store-bought bagged stuffing mix instead of cubing and drying your own bread, and make the gravy from broth rather than pan drippings if you’re not roasting a separate protein alongside it.
Variations to Try
Healthy/Lighter Version: Use a whole wheat bread for the stuffing base and swap the cream in the gravy for a splash of milk, keeping the dish lighter without losing the classic flavor profile.
Sausage-Stuffed Version: Cook and crumble breakfast sausage, mixing it into the stuffing base along with the onion and celery for a heartier, more savory version that works well as a standalone main dish.
Allergy-Friendly (Gluten-Free) Swap: Use gluten-free bread cubes for the stuffing base and substitute cornstarch for the flour in the gravy, whisking it into a slurry with cold water before adding it to the hot broth.
Meal-Prep Friendly: Shape and bake a full batch of stuffing balls ahead of time, then freeze in a single layer before transferring to a freezer bag, so you always have a comforting side ready to reheat.
Frequently Asked Questions
Can I make this ahead of time? Yes — you can shape the stuffing balls a day ahead and refrigerate them unbaked, then bake fresh when you’re ready to serve, and the gravy can be made a day in advance and reheated gently on the stove.
Why did my stuffing balls fall apart while baking? This usually happens when the mixture is too dry or doesn’t have enough egg to bind it. Make sure the bread is moistened enough to hold together when pressed, and don’t skip the egg, which is key to keeping the shape intact.
Can I use store-bought stuffing mix instead of cubing my own bread? Absolutely — a bagged stuffing mix works as a convenient shortcut and produces very similar results with much less prep time.
What can I use instead of chicken broth? Vegetable broth works as a substitute for a vegetarian version, or turkey broth if you happen to have it on hand from a holiday roast.
Can I make the gravy without pan drippings? Yes — a broth-based gravy works just as well if you don’t have drippings available, though drippings do add an extra layer of savory depth if you have them.
Related Recipes You Might Like
- Classic Herb Bread Stuffing
- Homemade Chicken and Gravy Over Biscuits
- Savory Sausage and Sage Dressing