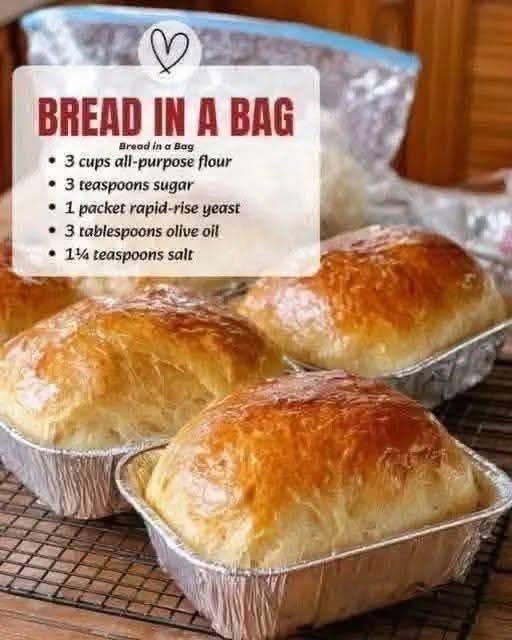
Baking fresh, warm homemade bread usually brings to mind hours of messy flour-dusted counters, complex kneading schedules, and giant mixing bowls to scrub. However, this genius “Bread in a Bag” method turns homemade baking into a fun, virtually mess-free process that produces tender, bakery-style mini loaves every single time.
By combining the convenience of mixing your dough inside a heavy-duty gallon zip-top bag with our signature garlic-butter flavor profile, you get restaurant-quality rolls or mini loaves with maximum flavor and minimal clean-up. Whether you are teaching young bakers, prepping a quick weeknight side dish, or making cozy comfort food for dinner, this recipe delivers perfect results. Let’s walk through the full ultimate guide to mastering bread in a bag!
1. Why You’ll Love This Recipe
- Mess-Free Mixing: Everything is contained inside a sealed zip-top bag, keeping your hands and kitchen counter clean.
- Beginner & Family Friendly: Perfect for novice bakers, kids, or anyone intimidated by traditional yeast doughs.
- Signature Garlic Butter Flavor: Brushed with rich melted butter, fresh garlic, and aromatic herbs before and after baking for maximum golden-brown crunch and richness.
- Fast Rise Time: Using rapid-rise yeast cuts down waiting time significantly, letting you enjoy warm bread in just about an hour.
2. Ingredients Overview & Notes
To get soft, golden loaves with a tender crumb, the simple ingredients listed in the recipe photo are combined with our rich garlic-butter finish:
Base Dough Ingredients:
- All-Purpose Flour (3 cups): Provides the fundamental structure for the bread. Bread flour can also be used if you prefer a slightly chewier crumb.
- Granulated Sugar (3 teaspoons): Feeds the yeast to jumpstart activation while adding a subtle sweetness.
- Rapid-Rise / Instant Yeast (1 packet / 2 1/4 teaspoons): Rapid-rise yeast allows the dough to rise quickly without requiring a long double-proof.
- Warm Water (1 cup, approx. 105°F to 110°F): Essential to hydrate the flour and activate the yeast.
- Olive Oil (3 tablespoons): Keeps the crumb soft, moist, and pliable.
- Salt (1 1/4 teaspoons): Enhances the savory flavor of the dough and tightens the gluten structure.
Garlic-Butter Finish:
- Unsalted Butter (3 tablespoons, melted): Adds a rich, golden glaze and velvety mouthfeel.
- Fresh Garlic (2 cloves, finely minced) or Garlic Powder (1/2 tsp): Gives that delicious steakhouse aroma and savory kick.
- Fresh Parsley or Italian Seasoning (1 teaspoon, minced): Adds a pop of green color and pleasant herbal flavor.
3. Essential Kitchen Equipment
- 1-Gallon Heavy-Duty Zip-Top Freezer Bag: Thick freezer bags prevent accidental tears or pops during squishing!
- Measuring Cups & Spoons
- Mini Foil Loaf Pans or Standard Loaf Pan: Small individual foil pans (as shown in the image) create cute mini loaves.
- Pastry Brush: For applying the garlic butter glaze.
- Wire Cooling Rack
4. Step-by-Step Instructions
Step 1: Start the Yeast Base in the Bag
Open your 1-gallon zip-top bag. Add 1 cup of all-purpose flour, the 3 teaspoons of sugar, and the 1 packet of rapid-rise yeast. Pour in 1 cup of warm water.
Press out most of the air from the bag and seal it tightly. Gently squeeze and knead the outside of the bag with your fingers for about 1 to 2 minutes until the flour is completely incorporated into a smooth batter. Let the sealed bag rest on your counter for 10 minutes so the yeast can warm up and bubble.
Step 2: Add Remaining Dough Ingredients
Unseal the bag carefully. Add the 3 tablespoons of olive oil, 1 1/4 teaspoons of salt, and 1 additional cup of flour. Reseal the bag, pressing out excess air, and squeeze the bag again for 2 minutes to blend the ingredients thoroughly.
Finally, open the bag, add the remaining 1 cup of flour (for a total of 3 cups), reseal, and knead the bag until a soft, cohesive ball of dough forms and pulls away from the plastic sides.
Step 3: Turn Out and Shape
Lightly dust a clean surface with a pinch of flour. Unseal the bag and slide the soft dough out onto the counter. Divide the dough equally into 3 or 4 small portions for mini foil pans (or keep it as 1 loaf for a standard 8×4 inch pan).
Gently shape each portion into a smooth log or ball and place them into greased mini foil loaf pans.
Step 4: The Quick Rise
Cover the loaf pans loosely with a warm, damp kitchen towel or plastic wrap. Place the pans in a warm, draft-free spot in your kitchen and let the dough rise for 20 to 30 minutes, or until doubled in size.
Step 5: Garlic-Butter Glaze and Bake
Preheat your oven to 375°F (190°C).
In a small dish, combine the melted butter, minced garlic, and chopped parsley. Brush half of this garlic butter mixture over the top of the risen dough loaves.
Bake in the preheated oven for 20 to 25 minutes (15 to 18 minutes for small mini loaves), or until the tops are deeply golden brown and sound hollow when gently tapped.
Step 6: Brush and Cool
Remove the bread from the oven and immediately brush the remaining garlic butter across the hot, shiny crusts. Let the loaves cool in the pans for 5 minutes, then transfer them to a wire rack. Serve warm with extra butter!
5. Pro Chef Tips for Success
- Check Water Temperature: Water that is too hot (above 120°F) will kill the yeast, while water that is cold won’t activate it properly. Aim for warm bath water temperature (around 105°F to 110°F).
- Use Freezer-Grade Bags: Standard thin sandwich bags can burst under pressure when squeezing dough. Heavy-duty freezer bags are built to handle the kneading.
- Don’t Over-Flour: The dough should feel soft, tender, and slightly tacky, not dry and stiff. If it feels too sticky to shape, add flour 1 tablespoon at a time.
6. Delicious Flavor Variations
- Garlic Parmesan Loaves: Fold 1/3 cup of freshly grated Parmesan cheese into the dough during the last flour addition in the bag, then sprinkle extra Parmesan on top before baking.
- Herb & Cheese Bread: Add 1/2 teaspoon of dried oregano, basil, and 1/2 cup of shredded cheddar cheese directly into the bag for savory cheese rolls.
- Cinnamon Sugar Twist: Skip the garlic, oil, and salt adjustments—instead brush the finished warm bread with melted butter and dust generously with cinnamon sugar for a sweet breakfast loaf!
7. Serving Ideas
- Pasta Companion: Serve alongside homemade spaghetti, fettuccine Alfredo, or lasagna to soak up rich sauces.
- Soup Dork: Perfect for dunking into hot tomato basil soup or creamy potato soup.
- Mini Dinner Rolls: Divide into 12 small balls inside a muffin tin for easy individual garlic butter dinner rolls!
8. Nutritional Highlights (Estimated per Mini Loaf)
- Calories: ~280 kcal
- Protein: 6g
- Carbohydrates: 42g
- Fat: 10g
- Sodium: 380mg
9. Storage & Reheating Instructions
- Room Temperature: Store cooled loaves in an airtight container or sealable plastic bag at room temperature for up to 3 days.
- Freezing: Wrap fully cooled loaves tightly in aluminum foil and freeze inside a freezer bag for up to 2 months.
- Reheating: Warm slices in a 350°F oven for 5 minutes to restore the crisp, freshly baked crust and soft center.
10. Budget & Cost Breakdown
- All-Purpose Flour: ~$0.60
- Yeast Packet: ~$0.75
- Sugar, Salt & Olive Oil: ~$0.30
- Butter, Garlic & Herbs: ~$0.85
- Total Cost: Under $2.50 for a full batch of fresh, warm artisan-style loaves!
11. Frequently Asked Questions (FAQ)
Can I make this without a zip-top bag? Yes! You can mix everything in a standard mixing bowl using a wooden spoon or spatula. The bag simply makes the clean-up effortless!
Can I use all-purpose flour instead of bread flour? Yes, all-purpose flour is actually specified in this recipe and yields wonderfully soft, tender mini loaves.
12. Conclusion & Social Media Sharing
This Garlic-Butter Bread in a Bag proves that you don’t need fancy tools or hours of time to enjoy fresh, warm homemade bread. It’s fun, fast, virtually mess-free, and yields delicious, buttery results every time!
13. Social Media Caption Template
Fresh, warm homemade bread made completely inside a bag—no messy counters required! ðŸžðŸ§„ Brushed with rich garlic butter and baked to golden perfection. The easiest baking hack you’ll ever try!
#BreadInABag #HomemadeBread #GarlicButterBread #EasyBaking #BakingHacks #ComfortFood #FreshBaking #HomeCooking #FoodieGrams
Are you baking these into cute mini loaves or individual dinner rolls for tonight’s meal?